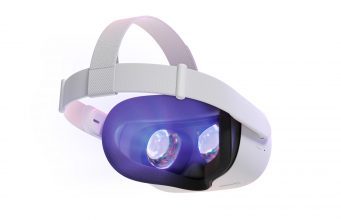
Oculus Quest 2 is one of the best headsets for first-time VR users, and it’s bringing plenty of new users into VR for the first time. Here’s seven tips worth knowing right out of the gate to improve your experience.
Updated – February 5th, 2021
1. Turn on Passthrough Background & Passthrough Shortcut
‘Passthrough’ is when you use the Quest 2 cameras to look outside the headset. You will have seen this when you first set up the device. And while it might seem novel at first to have your ‘virtual home’ be some sci-fi apartment or fantasy landscape, I can tell you now that using the passthrough view as your background actually makes the headset much easier to use.
That’s because you can put on the headset first and then easily see where your controllers are to pick them up, instead of blindly feeling around. This is also much nicer than putting on your headset while the controllers are dangling from your wrists by their straps.
Also, whenever you go back to your home space you’ll be able to see your relative position within your playspace boundary, allowing you to move back to the center in case you’ve wandered toward the edge (don’t be the next person to post a picture of the TV you broke while playing a VR boxing game).
And if you want to be able to quickly peek outside your headset, you don’t have to bother taking it off. With Passthrough Short enabled, you can double-tap on your headset to instantly toggle the passthrough view on and off to see who is calling your name or where to set your controllers down before you take off the headset. Here’s how:
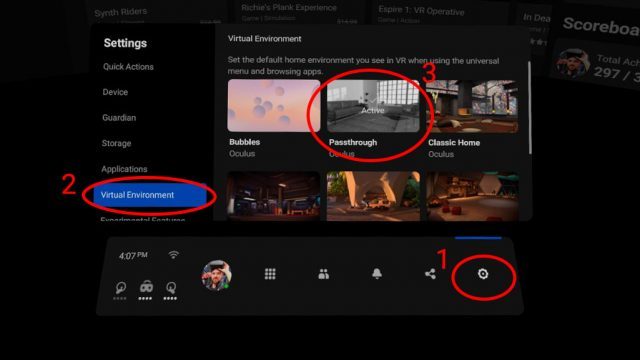
Turn on Passthrough Background
- In your headset, bring up the Quest menu by pressing the Oculus button on your right controller. Find the Settings section (gear icon).
- On the left of the Settings section select ‘Virtual Environment’
- Now select ‘Passthrough’ as your virtual environment option
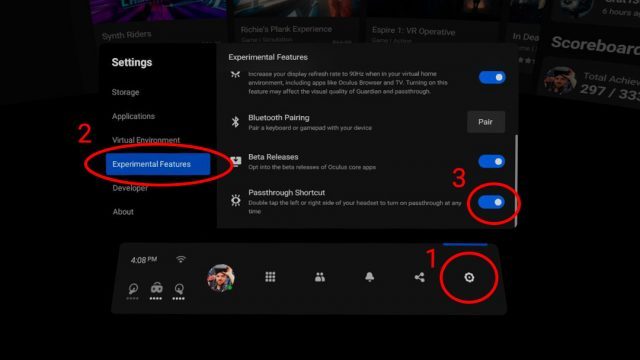
 Turn on Passthrough Shortcut
- In your headset, bring up the Quest menu by pressing the Oculus button on your right controller. Find the Settings section (gear icon).
- On the left of the Settings section select ‘Experimental Features’
- Now scroll until you find ‘Passthrough Shortcut’ and flip the switch
 When you return to your virtual home space you’ll see that you’re now just standing in your room with the Quest menus floating in front of you. Any time you can’t see the outside world, double-tap the side of your headset with your hand or controller to instantly see into the real world. Double tap again to return to VR.
2. Use Voice Commands to Navigate Quest 2 & Launch Apps
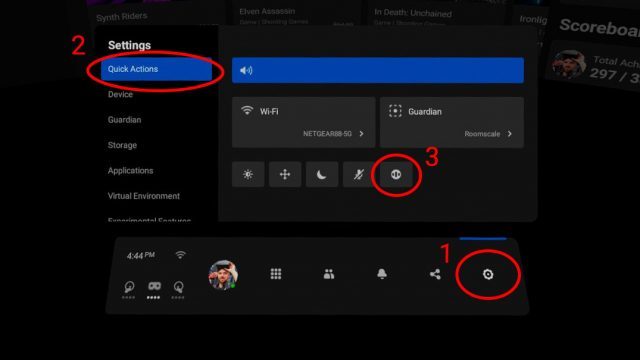
Voice Commands on Quest 2 are often the fastest and easiest way to navigate through your headset’s menus and launch games. Rather than fumbling through the app list, you can ask your headset to “launch Beat Saber.” Rather than digging through the Settings menu, you can ask “show me Guardian settings.” And rather than searching for a new game by typing the name into the search bar, you can say “search for The Walking Dead.” Here’s how:
- In your headset, bring up the Quest menu by pressing the Oculus button on your right controller. Find the Settings section (gear icon).
- In the Quick Actions section, click the circular Voice Commands icon to the right of the microphone (see photo below for the icon in question).
This will launch the Voice Commands setup and teach you what you can say. Once setup is complete, just double-tap the Oculus button on your right controller to trigger your headset to listen, then ask away!
3. Record, Stream, or Cast Your VR Gameplay on Quest 2
With something as cool as VR, it’s natural to want to share the experience. Luckily Quest 2 has many sharing options built right in. You can record videos of your gameplay, take screenshots, cast a video to your phone or TV, or even stream to viewers online. Here’s how:
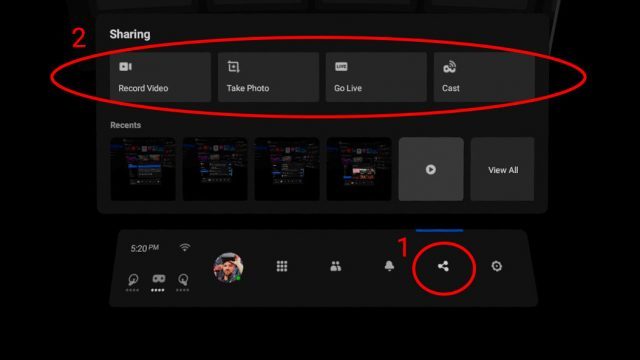
- In your headset, bring up the Quest menu by pressing the Oculus button on your right controller. Find the Share section (three dots connected by lines icon).
- At the top of the Share menu you can now choose between Record Video, Take Photo, Go Live, and Cast.
 You can even use the Voice Commands (that we shared in tip #3) to say “record video,” “take screenshot,” “cast,” or “stream” to quickly do any of these actions in the midst of gameplay.
Casting allows you to stream video of your experience to local devices. You can cast to your smartphone through the Oculus smartphone app. You can also cast to any compatible devices on your network like a TV with Chromecast.
Go Live allows you to stream your Quest 2 experience out to the internet, but unfortunately you can only stream to Facebook.
Recorded videos and captured photos are stored on the headset, you can access them by clicking the ‘View All’ button in the Share menu. You can also plug Quest 2 into a computer to download videos and screenshots for editing and sharing.
Continue Reading on Page 2 »
The post Seven Tips & Tricks for New Quest 2 Owners appeared first on Road to VR.
Ream more: https://www.roadtovr.com/oculus-quest-2-tips-and-tricks-new-owners/
No comments:
Post a Comment