
While it’s true that the Oculus Rift didn’t initially support room-scale tracking, Oculus has embraced large-scale tracking, allowing for 360 degree tracking and room-scale gameplay at similar sizes as the HTC Vive. This guide will show you the easiest way to get up and running with rooms-scale tracking starting with just two Sensors (cameras) and no drilling holes.
You might be wondering why you should consider setting up your tracking for room-scale. The answer is simple: the default setup places two Sensors in front of you, meaning you have to stay mostly facing forward in order for the controllers to be consistently tracked. Changing to a room-scale configuration means you can physically turn 360 degrees around, making a world of difference in experience compared to using a thumbstick to rotate. Depending upon your Sensor setup, you can achieve a much larger tracking area than the default setup, meaning you can physically walk around your VR playspace which can greatly enhance immersion.
It’s actually quite easy to configure your Rift for room-scale tracking. You won’t need to drill any holes or mark up your walls, and you can get started with the two Sensors you already have and just ~$18 in parts!
Setting Up the Oculus Rift for Room-scale Tracking
Although Oculus recommends buying an extra Sensor to use three Sensors for room-scale tracking, the truth is that you can get a solid 360 degree tracking experience starting with just two Sensors.
What You’ll Need
- Oculus Sensor (2x)
- Medium Command Hooks (1x pack of 2)
- Active USB 3.0 Extension Cable (1x)
- Command Light Clips (1x pack of 16) [optional, for clean cord arrangement]
Setting Up Your Sensors
You can reference Oculus’ official detailed guide here for a two-Sensor 360 setup, but if you’re already familiar with configuring your Sensors in the Oculus software then it’s just about placement.
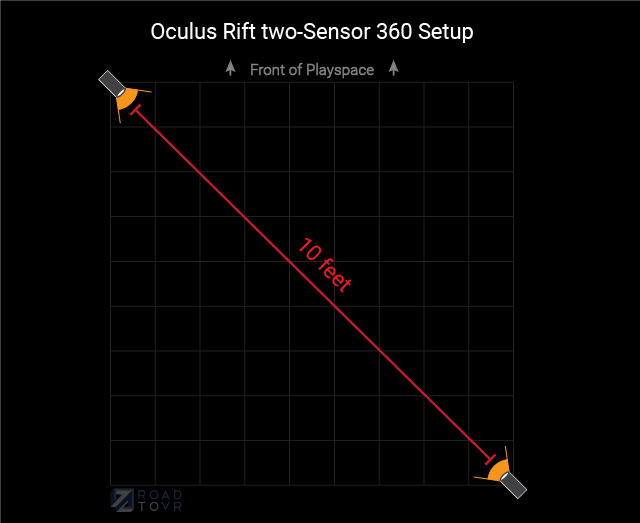
- Find two corners of a square playspace with walls that will allow you to mount your Sensors in opposite corners about 10 feet apart (you may be able to push a little further, but tracking quality could be impacted).
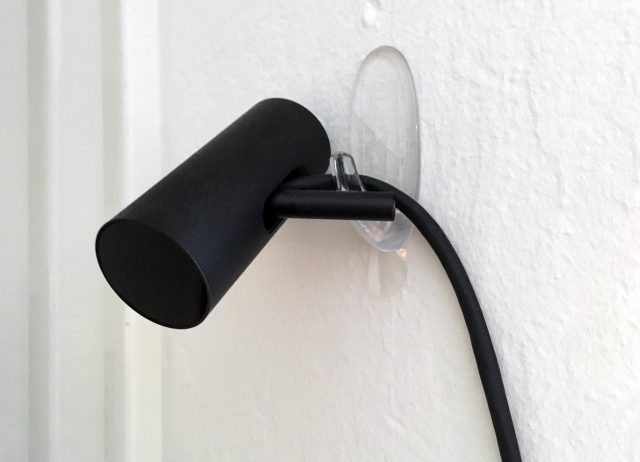
- Follow the instructions on the Medium Command Hooks carefully (we don’t want your Sensors falling to the ground!) and place one hook at each corner where you want to mount your Sensors. These hooks hold strong and come off clean (when installed and removed correctly), and mean you don’t need to drill any holes.
- Remove your Sensors from their included stands by holding the head of the camera and twisting the base until it unthreads.
- Thread the Sensor’s cable behind the hook (as if hanging the Sensor by the cable) with the Sensor head’s stem on the opposite side. Lean the back of the Sensor against your wall at an angle pointing at the opposite corner of the playspace through the center; adjust the tilt of the stem to get the Sensor to stay at the desired angle. If your walls are slick and the camera doesn’t stay at the correct angle, use a small loop of scotch tape between the camera and the wall to provide enough friction for the camera to lean against.
- For the Sensor in the opposite corner, further from the computer, use the USB 3.0 extension cable to reach.
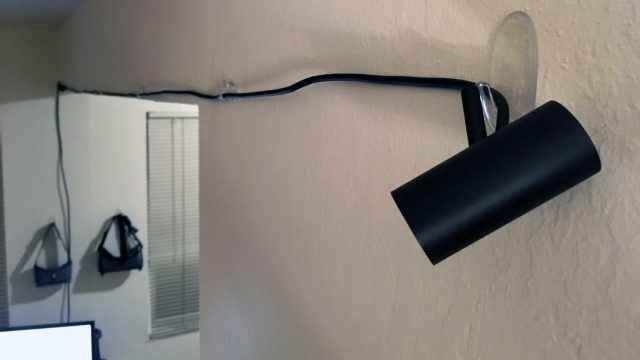
- [Optional] Apply the Command Light Clips every two feet or so along the path you’d like the Sensor cables to run. Slide the cable into the Light Clips for a cleaner look.
Configuring the Oculus Software
Once you’ve completed your Sensor placement, you’ll need to configure your playspace for this Sensor setup through the Oculus software.
- After launching the Oculus software, select Settings > Devices > Configure Rift > Sensor Setup.
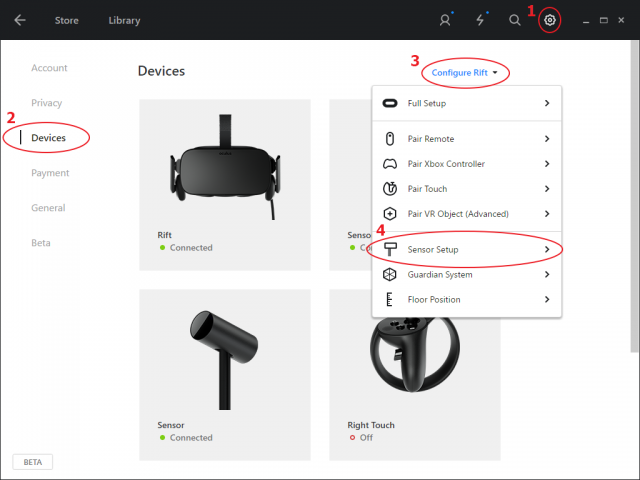
- Follow the instructions until the Adjust Sensor Position page. (Note: If you get a error about one or both of your sensors not working correctly, place your Rift in the middle of the playspace in clear view of both Sensors).
- Ignore the warning about your Sensors being further than 6 feet apart, click Next. You will get another warning, ignore this warning too and click Proceed.
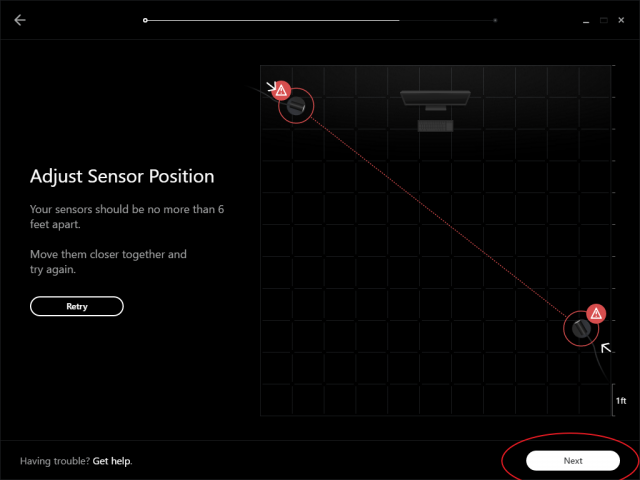
- Trace out your playspace in the next stage as large as you can based on what the Sensors can detect. Continue with the setup wizard to define the center of your playspace and complete the setup.
Now you’re ready to play!
Easily Upgrade to an Even Larger Rift Tracking Space with an Extra Sensor
Since you’ll already have two Sensors by the time you have an Oculus Rift and Touch controllers, using a two-Sensor setup is the fastest way to get up and running, but now that you know the process, adding a third Sensor for even better and larger tracking is breeze.
- Acquire an extra Sensor and Medium Command Hook (Note: When purchased from Amazon US, the extra Sensor comes included with a 5 meter USB extension cable.)
- Using the same procedure outlined in the two-Sensor setup guide above, mount your extra Sensor in the unoccupied corner at the front of your playspace (so that you have two sensors in the front corners and one sensor in one of the rear corners).
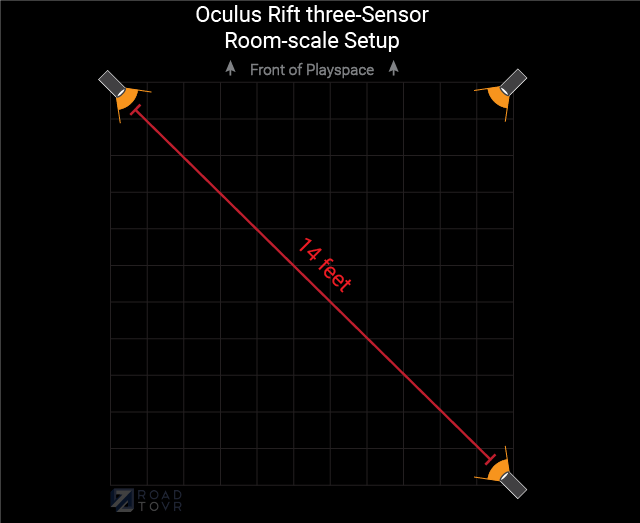
- The rear Sensor can be up to 14-feet away from the Sensor in the diagonal corner of the playspace, so consider mounting it further back for a larger tracking area.
- Oculus recommends that two of the Sensors be plugged into USB 3.0 ports and one sensor be plugged into a USB 2.0 port. See details on USB bandwidth balancing here.
- Run through the ‘Configuring the Oculus Software’ section on this page.
Now you’re ready to play!
Four Sensor Oculus Rift Setup?
So we’ve covered two and three-Sensor Rift tracking configurations… how about a fourth? While technically possible, Oculus’ recommendation is that four-Sensor Rift setups tend to be more problematic than they’re worth, so consider it experimental if you want to make the attempt. If you do want to try four Sensors with the Rift, consider reading up on USB bandwidth balancing first.
Finding Room-scale and 360 Games on the Oculus Rift
Generally speaking, any Oculus Rift game which works for the default front-facing Sensor configuration should work fine with room-scale Rift setups, but you’ll get the best experience from games that are specifically designed to support 360 and room-scale.
Every game in the Oculus store has an ‘Additional Details’ section at the bottom of its store page where you can see which Tracking Modes and Player Modes the developers have indicated support for, including 360 and room-scale.
![]()
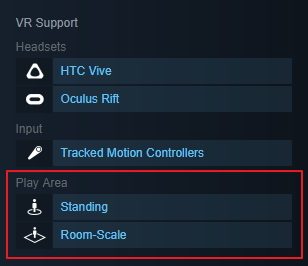
You can of course also find games supporting the Oculus Rift on Steam, and—because Steam is the home of the HTC Vive which has room-scale tracking by default—you may find some games that take better advantage of your new room-scale tracking space. When you find a VR game on Steam, look on the right side of the Store page for the ‘VR Support’ section which specifies which headsets and tracking playspaces are supported by the game.
Oculus Rift Room-scale Setup Tips
- If you want to optimize your tracking quality and playspace size, considering testing your setup with Sensors on tripods before mounting them to the wall. The threading in the stem of the Sensor is a standard 1/4 inch tripod socket.
- If you’re wondering which USB extension cables to buy, make sure you purchase an ‘Active’ USB extension cable (we’ve had good luck with this one). Oculus recommends a ~16ft extension cable; greatly exceeding that could cause issues.
- For a three-Sensor setup, Oculus recommends that two Sensors plug into USB 3.0 ports and one Sensor plugs into USB 2.0 port. Learn about why here. For a two-Sensor setup, you should ideally have both plugged into USB 3.0 ports, but you can get away with one of the two in a USB 2.0 port in a pinch.
- If you want an even cleaner look when mounting the Sensor heads on the Command Hooks, consider mounting the hook upside down after drilling a hole at the base of the curve of the hook wide enough to fit the stem of the Sensor through. Or consider buying a 3D printed mount that comes included with adhesive Command strips.
The post The Easiest Way to Set Up Oculus Rift Room-scale Tracking (without drilling any holes) appeared first on Road to VR.
Ream more: https://www.roadtovr.com/oculus-rift-room-scale-tracking-setup-guide-easiest-no-drilling-holes-cheapest/


No comments:
Post a Comment